
In my previous post I addressed the concept of dependency injection (DI) and what the advantages are by using this technique. In this post we will look at little closer at some concrete examples on how to use StructureMap to help resolve dependencies (injecting the correct objects to each class that has an dependency on an interface).
Like all good super heroes a coder need a tech saavy helper, that make sure the hero has all the tools needed for the job. James Bond has Q, Batman has Alfred and .NET has StructureMap.
What is StructureMap?
StructureMap is a DI framework, that rely heavly on conventions to resolve the dependecies a class has. It is preferable to choose the convention based approach, in order to save as much time on the tedious configuration. The main convention in StructureMap is that it rely on the name of the interfaces and classes to "connect the dots". The common naming convention is to prefix all your interfaces with "I" and StructureMap leverages this convention.
If a class is depending on an interface IBar, StructureMap will look for a concrete class called Bar. This means everytime you have a one to one realationship between an interface and a class (IBar to Bar), this is handled automatically, without any extra configuration. There will of course always be some configuration - especially if the dependecies does not fall into the default convention - we'll take a look at this next.
Configuring StructureMap in ASP.NET MVC
I'll use an ASP.NET MVC project as an example. First we have to install StructureMap in the solution. This is easiest done from the package manager console:
Install-Package StructureMap.MVC5
At the time of writing I'm running MVC version 5 and hence is using the package targeted this version. After all the dependecies has been installed a new folder called "DependencyResolution" has been created in the root of the web application project. In this folder open the DefaultRegistry.cs file:
public class DefaultRegistry : Registry {
        public DefaultRegistry() {
            Scan(
                scan => {
                    scan.TheCallingAssembly();
                    scan.WithDefaultConventions();
                    scan.With(new ControllerConvention());
                });
        }
    }
The body of the call to Scan is where the container is configured. The most important part here is to configure which assemblies StructureMap should search when resolving a dependency. The call to scan.TheCallingAssembly() means that StructureMap will be able to resolve all classes in the current assembly (all classes in the web project in this case).
Usually the solution will consist of more than one project. This could be a class library with all the domain classes. In this case StructureMap must be configured to include these assemblies when resolving a dependency. Let's illustrate this with an example.
Including assemblies
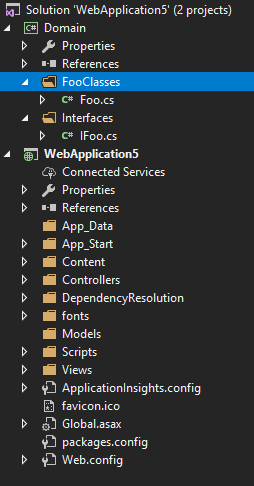
In the solution on the right, there are two projects: a class library called Domain, which contains an interface and a concrete implementation of the interface, and a MVC project. Assuming that the MVC project has a reference to the Domain project and uses an instance of the IFoo interface, we must set up StructureMap to find the correct assembly and resolve the correct concrete implementation of IFoo.
The controller could look something like this:
public class HomeController : Controller
    {
        private IFoo _foo;

        public HomeController(IFoo foo)
        {
            _foo = foo;
        }

        public ActionResult Index()
        {
            return View();
        }
    }
At this moment StructureMap does not know about the Domain assembly and will throw an exception (a very confusing "Class has not parameterless constructur" error, which does not indicate that it is a StructureMap issue). In order to get StructureMap to inject an instance of Foo, when the controller is created and is requires an instance of IFoo, StructureMap must be configured to look in the Domain assembly. This is done fairly simple by telling StructureMap to add the assembly containing the required classes and interfaces. There is a few ways to do this, but the two most simple ways are adding it by the assembly name or pointing to a type (ie. class, interface) in the assembly. Just remember that if you change the assembly name/move the type to another assembly, StructureMap will not be able to find the correct assembly needed for the dependency injection.
The code for configuring StructureMap to look in the Domain assembly in the small test project looks like this (code using the method pointing to a type is commented out):
public DefaultRegistry() {
            Scan(
                scan => {
                    scan.TheCallingAssembly();
                    scan.WithDefaultConventions();
					scan.With(new ControllerConvention());
                    //scan.AssemblyContainingType<Foo>();
                    scan.Assembly("Domain");
                });
        }
When conventions doesn't cut it
Obviously the example above is very basic, but it really get you off the ground in a hurry and let's you focus on the code instead of the configuration. When you run into scenarios that does not fit into the common StructureMap conventions a little configuration is needed. But fortunately the good guys and girls at StructureMap made sure that this is very easy to set up using the fluent API.
Let's assume that we have a concrete implementation of IFoo that is called Bar. Obviously this does not match the StructureMap conventions (IFoo -> Foo) and in order for StructureMap to handle this, we must configure this. The configuration is quite simple and readable and must be added after the call to Scan. The syntax is For<TheInterfaceName>().Use<TheTypeYouWantInjected>();. It looks like this:
public DefaultRegistry() {
            Scan(
                scan => {
                    scan.TheCallingAssembly();
                    scan.WithDefaultConventions();
					scan.With(new ControllerConvention());
                    //scan.AssemblyContainingType<Foo>();
                    scan.Assembly("Domain");
                });
                For<IFoo>().Use<Bar>();
        }
Now each time a class requires a concrete type of IFoo StructureMap will inject an instance of Bar. You can even add logic in the configuration, if the application have different dependencies in different situations. This could look something like this:
public DefaultRegistry() {
            Scan(
                scan => {
                    scan.TheCallingAssembly();
                    scan.WithDefaultConventions();
					scan.With(new ControllerConvention());
                    //scan.AssemblyContainingType<Foo>();
                    scan.Assembly("Domain");
                });
            if (someBoolValue)
            {
                For<IFoo>().Use<Bar>();
            }
            else
            {
                For<IFoo>().Use<Foo>();
            }
        }
I have used this approach with a webshop where there were different business rules (ie. VAT, tax, delivery) depending on which country the customer was from.