.NET tanker & tips

.Net, jQuery og andre nørdede emner

Let StructureMap be your Alfred

juli 11
by steffen 11. juli 2018 14:03

Alfred Pennyworth - http://www.mothershiptoys.com/hot-toys-mms236-batman-armory-with-bruce-wayne-and-alfred-pennyworth.html

In my previous post I addressed the concept of dependency injection (DI) and what the advantages are by using this technique. In this post we will look at little closer at some concrete examples on how to use StructureMap to help resolve dependencies (injecting the correct objects to each class that has an dependency on an interface). 

Like all good super heroes a coder need a tech saavy helper, that make sure the hero has all the tools needed for the job. James Bond has Q, Batman has Alfred and .NET has StructureMap. 

What is StructureMap?

StructureMap is a DI framework, that rely heavly on conventions to resolve the dependecies a class has. It is preferable to choose the convention based approach, in order to save as much time on the tedious configuration. The main convention in StructureMap is that it rely on the name of the interfaces and classes to "connect the dots". The common naming convention is to prefix all your interfaces with "I" and StructureMap leverages this convention.

If a class is depending on an interface IBar, StructureMap will look for a concrete class called Bar. This means everytime you have a one to one realationship between an interface and a class (IBar to Bar), this is handled automatically, without any extra configuration. There will of course always be some configuration - especially if the dependecies does not fall into the default convention - we'll take a look at this next.

Configuring StructureMap in ASP.NET MVC

I'll use an ASP.NET MVC project as an example. First we have to install StructureMap in the solution. This is easiest done from the package manager console:

Install-Package StructureMap.MVC5

At the time of writing I'm running MVC version 5 and hence is using the package targeted this version. After all the dependecies has been installed a new folder called "DependencyResolution" has been created in the root of the web application project. In this folder open the DefaultRegistry.cs file:

public class DefaultRegistry : Registry {
        public DefaultRegistry() {
            Scan(
                scan => {
                    scan.TheCallingAssembly();
                    scan.WithDefaultConventions();
                    scan.With(new ControllerConvention());
                });
        }
    }

The body of the call to Scan is where the container is configured. The most important part here is to configure which assemblies StructureMap should search when resolving a dependency. The call to scan.TheCallingAssembly() means that StructureMap will be able to resolve all classes in the current assembly (all classes in the web project in this case).

Usually the solution will consist of more than one project. This could be a class library with all the domain classes. In this case StructureMap must be configured to include these assemblies when resolving a dependency. Let's illustrate this with an example.

Including assemblies
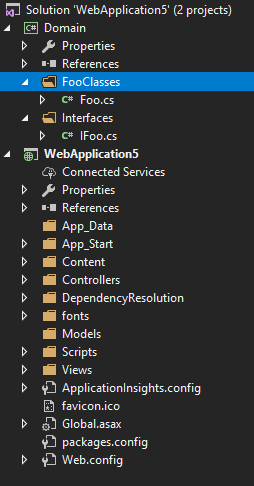
In the solution on the right, there are two projects: a class library called Domain, which contains an interface and a concrete implementation of the interface, and a MVC project. Assuming that the MVC project has a reference to the Domain project and uses an instance of the IFoo interface, we must set up StructureMap to find the correct assembly and resolve the correct concrete implementation of IFoo. 

The controller could look something like this:

public class HomeController : Controller
    {
        private IFoo _foo;

        public HomeController(IFoo foo)
        {
            _foo = foo;
        }

        public ActionResult Index()
        {
            return View();
        }
    }

At this moment StructureMap does not know about the Domain assembly and will throw an exception (a very confusing "Class has not parameterless constructur" error, which does not indicate that it is a StructureMap issue). In order to get StructureMap to inject an instance of Foo, when the controller is created and is requires an instance of IFoo, StructureMap must be configured to look in the Domain assembly. This is done fairly simple by telling StructureMap to add the assembly containing the required classes and interfaces. There is a few ways to do this, but the two most simple ways are adding it by the assembly name or pointing to a type (ie. class, interface) in the assembly. Just remember that if you change the assembly name/move the type to another assembly, StructureMap will not be able to find the correct assembly needed for the dependency injection.

The code for configuring StructureMap to look in the Domain assembly in the small test project looks like this (code using the method pointing to a type is commented out):

public DefaultRegistry() {
            Scan(
                scan => {
                    scan.TheCallingAssembly();
                    scan.WithDefaultConventions();
					scan.With(new ControllerConvention());
                    //scan.AssemblyContainingType<Foo>();
                    scan.Assembly("Domain");
                });
        }

When conventions doesn't cut it

Obviously the example above is very basic, but it really get you off the ground in a hurry and let's you focus on the code instead of the configuration. When you run into scenarios that does not fit into the common StructureMap conventions a little configuration is needed. But fortunately the good guys and girls at StructureMap made sure that this is very easy to set up using the fluent API.

Let's assume that we have a concrete implementation of IFoo that is called Bar. Obviously this does not match the StructureMap conventions (IFoo -> Foo) and in order for StructureMap to handle this, we must configure this. The configuration is quite simple and readable and must be added after the call to Scan. The syntax is For<TheInterfaceName>().Use<TheTypeYouWantInjected>();. It looks like this:

public DefaultRegistry() {
            Scan(
                scan => {
                    scan.TheCallingAssembly();
                    scan.WithDefaultConventions();
					scan.With(new ControllerConvention());
                    //scan.AssemblyContainingType<Foo>();
                    scan.Assembly("Domain");
                });
                For<IFoo>().Use<Bar>();
        }

Now each time a class requires a concrete type of IFoo StructureMap will inject an instance of Bar. You can even add logic in the configuration, if the application have different dependencies in different situations. This could look something like this:

public DefaultRegistry() {
            Scan(
                scan => {
                    scan.TheCallingAssembly();
                    scan.WithDefaultConventions();
					scan.With(new ControllerConvention());
                    //scan.AssemblyContainingType<Foo>();
                    scan.Assembly("Domain");
                });
            if (someBoolValue)
            {
                For<IFoo>().Use<Bar>();
            }
            else
            {
                For<IFoo>().Use<Foo>();
            }
        }

I have used this approach with a webshop where there were different business rules (ie. VAT, tax, delivery) depending on which country the customer was from. 

Tags: , ,

ASP.NET | ASP.NET MVC | Dependency Injection

Let StructureMap be your Alfred

juli 11
by steffen 11. juli 2018 14:01

Alfred Pennyworth - http://www.mothershiptoys.com/hot-toys-mms236-batman-armory-with-bruce-wayne-and-alfred-pennyworth.html

In my previous post I addressed the concept of dependency injection (DI) and what the advantages are by using this technique. In this post we will look at little closer at some concrete examples on how to use StructureMap to help resolve dependencies (injecting the correct objects to each class that has an dependency on an interface). 

Like all good super heroes a coder need a tech saavy helper, that make sure the hero has all the tools needed for the job. James Bond has Q, Batman has Alfred and .NET has StructureMap. 

What is StructureMap?

StructureMap is a DI framework, that rely heavly on conventions to resolve the dependecies a class has. It is preferable to choose the convention based approach, in order to save as much time on the tedious configuration. The main convention in StructureMap is that it rely on the name of the interfaces and classes to "connect the dots". The common naming convention is to prefix all your interfaces with "I" and StructureMap leverages this convention.

If a class is depending on an interface IBar, StructureMap will look for a concrete class called Bar. This means everytime you have a one to one realationship between an interface and a class (IBar to Bar), this is handled automatically, without any extra configuration. There will of course always be some configuration - especially if the dependecies does not fall into the default convention - we'll take a look at this next.

Configuring StructureMap in ASP.NET MVC

I'll use an ASP.NET MVC project as an example. First we have to install StructureMap in the solution. This is easiest done from the package manager console:

Install-Package StructureMap.MVC5

At the time of writing I'm running MVC version 5 and hence is using the package targeted this version. After all the dependecies has been installed a new folder called "DependencyResolution" has been created in the root of the web application project. In this folder open the DefaultRegistry.cs file:

public class DefaultRegistry : Registry {
        public DefaultRegistry() {
            Scan(
                scan => {
                    scan.TheCallingAssembly();
                    scan.WithDefaultConventions();
                    scan.With(new ControllerConvention());
                });
        }
    }

The body of the call to Scan is where the container is configured. The most important part here is to configure which assemblies StructureMap should search when resolving a dependency. The call to scan.TheCallingAssembly() means that StructureMap will be able to resolve all classes in the current assembly (all classes in the web project in this case).

Usually the solution will consist of more than one project. This could be a class library with all the domain classes. In this case StructureMap must be configured to include these assemblies when resolving a dependency. Let's illustrate this with an example.

Including assemblies

In the solution on the right, there are two projects: a class library called Domain, which contains an interface and a concrete implementation of the interface, and a MVC project. Assuming that the MVC project has a reference to the Domain project and uses an instance of the IFoo interface, we must set up StructureMap to find the correct assembly and resolve the correct concrete implementation of IFoo. 

The controller could look something like this:

public class HomeController : Controller
    {
        private IFoo _foo;

        public HomeController(IFoo foo)
        {
            _foo = foo;
        }

        public ActionResult Index()
        {
            return View();
        }
    }

At this moment StructureMap does not know about the Domain assembly and will throw an exception (a very confusing "Class has not parameterless constructur" error, which does not indicate that it is a StructureMap issue). In order to get StructureMap to inject an instance of Foo, when the controller is created and is requires an instance of IFoo, StructureMap must be configured to look in the Domain assembly. This is done fairly simple by telling StructureMap to add the assembly containing the required classes and interfaces. There is a few ways to do this, but the two most simple ways are adding it by the assembly name or pointing to a type (ie. class, interface) in the assembly. Just remember that if you change the assembly name/move the type to another assembly, StructureMap will not be able to find the correct assembly needed for the dependency injection.

The code for configuring StructureMap to look in the Domain assembly in the small test project looks like this (code using the method pointing to a type is commented out):

public DefaultRegistry() {
            Scan(
                scan => {
                    scan.TheCallingAssembly();
                    scan.WithDefaultConventions();
					scan.With(new ControllerConvention());
                    //scan.AssemblyContainingType<Foo>();
                    scan.Assembly("Domain");
                });
        }

When conventions doesn't cut it

Obviously the example above is very basic, but it really get you off the ground in a hurry and let's you focus on the code instead of the configuration. When you run into scenarios that does not fit into the common StructureMap conventions a little configuration is needed. But fortunately the good guys and girls at StructureMap made sure that this is very easy to set up using the fluent API.

Let's assume that we have a concrete implementation of IFoo that is called Bar. Obviously this does not match the StructureMap conventions (IFoo -> Foo) and in order for StructureMap to handle this, we must configure this. The configuration is quite simple and readable and must be added after the call to Scan. The syntax is For<TheInterfaceName>().Use<TheTypeYouWantInjected>();. It looks like this:

public DefaultRegistry() {
            Scan(
                scan => {
                    scan.TheCallingAssembly();
                    scan.WithDefaultConventions();
					scan.With(new ControllerConvention());
                    //scan.AssemblyContainingType<Foo>();
                    scan.Assembly("Domain");
                });
                For<IFoo>().Use<Bar>();
        }

Now each time a class requires a concrete type of IFoo StructureMap will inject an instance of Bar. You can even add logic in the configuration, if the application have different dependencies in different situations. This could look something like this:

public DefaultRegistry() {
            Scan(
                scan => {
                    scan.TheCallingAssembly();
                    scan.WithDefaultConventions();
					scan.With(new ControllerConvention());
                    //scan.AssemblyContainingType<Foo>();
                    scan.Assembly("Domain");
                });
            if (someBoolValue)
            {
                For<IFoo>().Use<Bar>();
            }
            else
            {
                For<IFoo>().Use<Foo>();
            }
        }

I have used this approach with a webshop where there were different business rules (ie. VAT, tax, delivery) depending on which country the customer was from. 

Tags: , ,

ASP.NET | ASP.NET MVC | Dependency Injection

IIS is dead - Long live IIS!

december 22
by steffen 22. december 2014 14:35

A major part developing is debugging. Stepping through your code, inspecting variable and verifying the the program flow behaves as predicted is an essential skill for any developer. The debugger in Visual Studio is pretty good. Place you desired breakpoint, hit F5 and Visual Studio will fire up the local IIS and open up a new browser window (if it is a web application) and you're good to go.

The process of perfecting the code is usually requires alot of "trial and error", where each time you start the debugger, find a bug, stop the debugger, fix the bug and start over. By default Visual Studio will shut down the local IIS when you stop the debugger. That means that if you make a small fix in the code and compile it, you can't just refresh the browser and see the result of the new code instantly. 

Luckily there is an easy fix for this. In Visual Studio go to "Tools -> Options" and in this small popup window, find "Debugging -> Edit and Continue". Remove the checkmark in the "Enable Edit and Continue" from the checkbox and you're all good to go.

IIS will always shut down, when you close Visual Studio. If you want to shut down IIS without closing Visual Studion, go to the system tray, right click the IIS icon and choose close.


Tags: ,

ASP.NET | ASP.NET MVC | CodeProject | General

Transformation af web.config

november 01
by steffen 1. november 2013 13:57

Når man skal deploye en web applikation er der ofte en masse ændringer i web.config'en, fordi man benytter nogle bestemte indstillinger når man udvikler lokalt ift. hvad der skal bruges på produktionsserveren. Den mest oplagte er selvfølgelig at fjerne debug=true fra compilation elementet, samt at ændre connectionstring elementet, hvis man har siddet og udviklet op mod en test-database. 

Det sørger Visual Studio heldigvis for at klare på en nem og bekvem måde. I Solution exploreren kan man folde web.config ud, ligesom man kan med aspx-filer for at se deres codebehind. Når man gør det er der en web.release.config og en web.debug.config. Disse to filer bruges til at lave ændringer i web.config alt efter om man har valgt debug eller release, når man compiler projektet. Hvis du har flere compilation profiler, kan du få tilføjet én til hver af profilerne, ved at højreklikke på web.config og vælge "Add config transform".

Transformationsfilerne ligner meget en web.config, bare med mindre indhold. Man angiver de forskellige steder i web.config'en man gerne vil lave ændringer, ved at opbygge xml-strukturen lige som den ser ud i web.config. Det vil sige at hvis man f.eks. gerne vil ændre noget i en af elementerne under <connectionStrings>, skal der være de samme elementer som i web.config'en. 

<?xml version="1.0"?>
  <configuration xmlns:xdt="http://schemas.microsoft.com/XML-Document-Transform">
    <connectionStrings>
      <add name="database_connection"
        connectionString="Data Source=MySource;Initial Catalog=DbName;Persist Security Info=True;User ID=MyDbUser;Password=MyPassword"
        xdt:Transform="SetAttributes" xdt:Locator="Match(name)"/>
    </connectionStrings>
    <system.web>
      <compilation xdt:Transform="RemoveAttributes(debug)" />
    </system.web>
  </configuration>

Der er mange forskellige muligheder for at manipulere indholdet i web.config'en, men den mest normale er, som vist ovenfor, at man gerne vil benytte en anden connection string, når man deployer til produktionsmiljøet. Først skal XML-elementet findes (i dette tlifælde et givent add-element under connectionstring elementet). Man angiver dette vha. 'xdt:Locator' hvor man giver værdien 'Match(name)'. Det betyder at der matches på attributen 'name' på det pågældende element. Herefter angives det hvad man ønsker at gøre ved elementet og angives 'xdt:Transform', hvor man angiver værdien 'SetAttribute'. 

Man kan teste de forskellige transformationer ved at i Visual Studio højre klikke på den transformation man vil se (f.eks. filen web.release.config for at se release transformationen) og vælge 'Preview Transform'.

Tags:

ASP.NET | ASP.NET MVC